> For the complete documentation index, see [llms.txt](https://navixy.com/docs/llms.txt). Markdown versions of documentation pages are available by appending `.md` to page URLs; this page is available as [Markdown](https://navixy.com/docs/user/ru/guide/devices-and-settings/vehicle-sensors/specialized-sensors-by-manufacturer/teltonika-sensors/ble-beacons-teltonika.md).
# BLE-метки (Teltonika)
Маяки Teltonika BLE — это универсальные устройства, которые могут собирать данные о температуре, магнитном состоянии и передавать свои идентификаторы на большие расстояния — до 200 метров на открытой местности.
Эти маяки используют **Bluetooth Low Energy** технологию (BLE 4.0+), известную своей энергоэффективностью, что позволяет им работать длительное время от внутренних батарей — до 2 лет для моделей SLIM, до 5 лет для моделей COIN и до 19 лет для моделей PUCK.
Маяки заключены в корпуса со степенью защиты IP68, обеспечивающей надежную защиту от пыли и воды.
## Поддерживаемые модели маяков
* **Blue COIN MAG**: Небольшой магнитный маяк
* **Blue PUCK MAG**: Большой магнитный маяк
* **Blue COIN ID**: Небольшой маяк ID
* **Blue PUCK ID**: Большой маяк ID
* **Blue SLIM ID**: Маяк размером с карту для идентификации сотрудника
* **Blue COIN T**: Небольшой маяк температуры
* **Blue PUCK T**: Большой маяк температуры
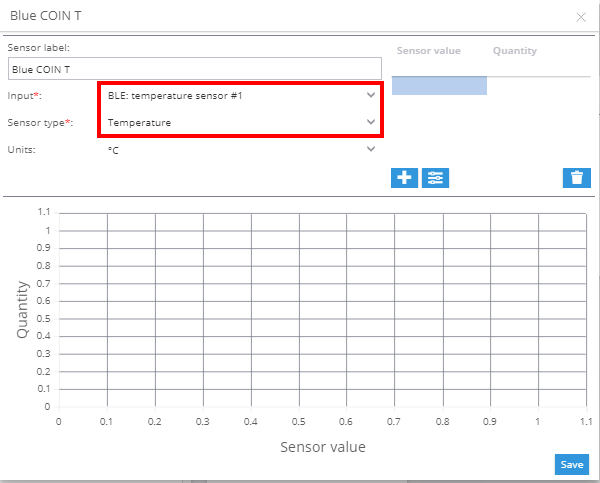
### Датчики температуры
Чтобы добавить датчик температуры:
1. Перейдите в раздел измерительных датчиков на вкладке «Входы».
2. Выберите **BLE: Temperature** в качестве типа входа.
3. Выберите **Температура** в качестве типа датчика.
### Магнитные датчики
Магнитные датчики отображают свой статус в **Показания датчиков** блоке [Виджет объекта](/docs/user/ru/guide/tracking/objects-list/object-widget.md). Этот виджет позволяет отслеживать, активен ли датчик в данный момент или нет.
### Датчики идентификации водителя
Датчики идентификации работают аналогично iButton и RFID, но без необходимости в физическом считывателе. Когда датчик находится в зоне действия трекера, его идентификатор будет автоматически отображаться.
**См. также:**
* [Назначение ключей ID водителя в профиле водителя](/docs/user/ru/guide/fleet-management/drivers.md)
* [Идентификация водителя (Правила и уведомления)](/docs/user/ru/guide/events-and-notifications/scheduling-and-dispatching/driver-identification.md)
---
# Agent Instructions
This documentation is published with GitBook. GitBook is the documentation platform designed so that both humans and AI agents can read, navigate, and reason over technical content effectively. Learn more at gitbook.com.
## Querying This Documentation
If you need additional information that is not directly available in this page, you can query the documentation dynamically by asking a question.
Perform an HTTP GET request on the current page URL with the `ask` query parameter, and the optional `goal` query parameter:
```
GET https://navixy.com/docs/user/ru/guide/devices-and-settings/vehicle-sensors/specialized-sensors-by-manufacturer/teltonika-sensors/ble-beacons-teltonika.md?ask=&goal=
```
`ask` is the immediate question: it should be specific, self-contained, and written in natural language.
`goal` is optional and describes the broader end goal you are ultimately trying to accomplish on behalf of the user. GitBook uses it to tailor the answer towards what is most useful for that goal.
The response will contain a direct answer to the question and relevant excerpts and sources from the documentation.
Use this mechanism when the answer is not explicitly present in the current page, you need clarification or additional context, or you want to retrieve related documentation sections.