> For the complete documentation index, see [llms.txt](https://navixy.com/docs/llms.txt). Markdown versions of documentation pages are available by appending `.md` to page URLs; this page is available as [Markdown](https://navixy.com/docs/user/guide/field-service/tasks.md).
# Tasks
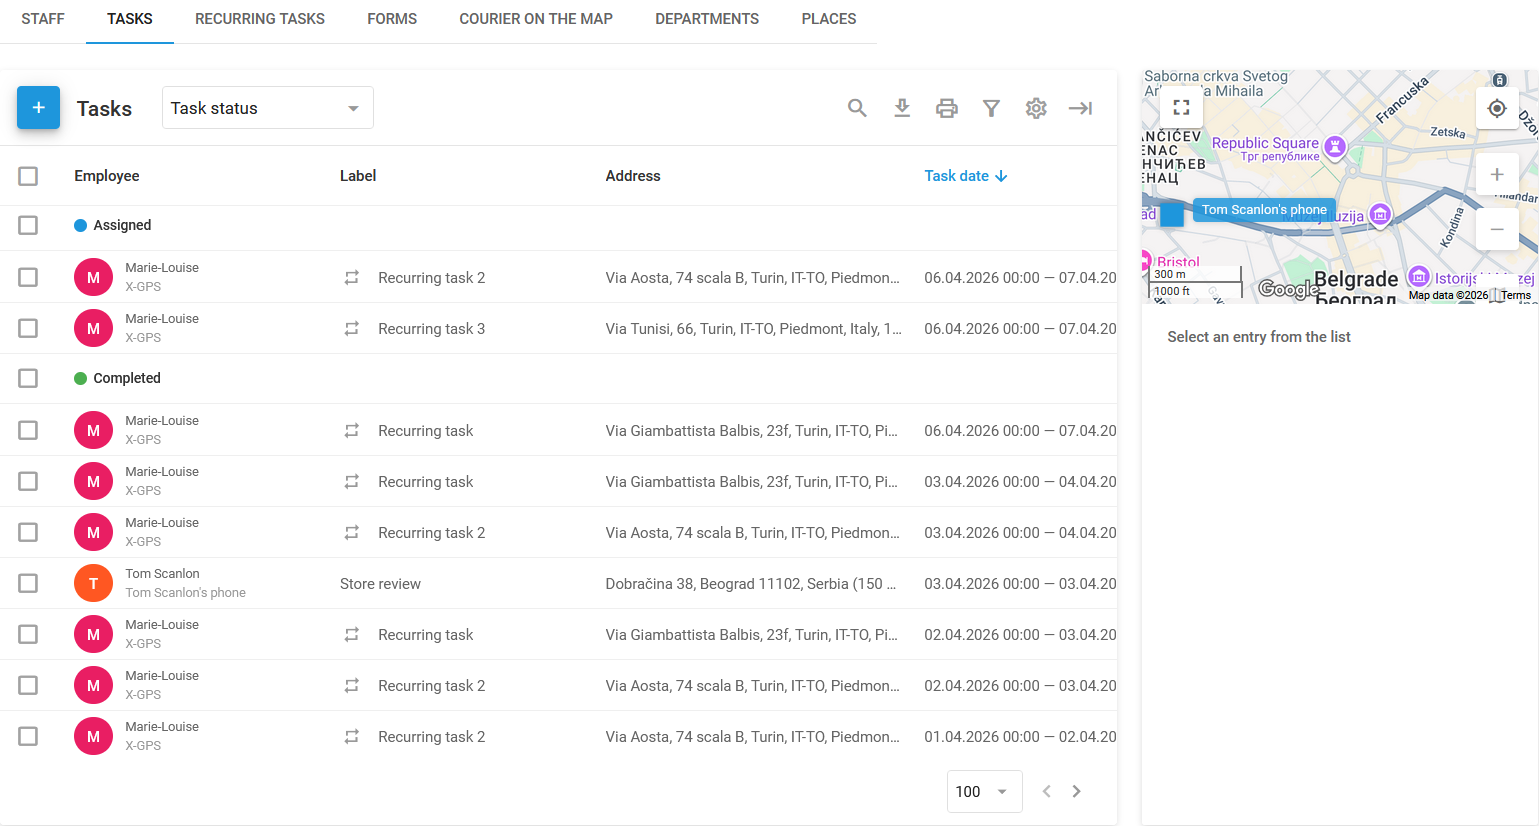
Create and assign field tasks to employees, set locations, deadlines, and forms. Monitor task status on a map, table, or timeline view in real time.
A **Task** in Navixy refers to a specific assignment or job that needs to be completed by an employee or field worker. It includes detailed instructions about what needs to be done, where it should be done, and within what timeframe. Tasks can range from simple one-off assignments, such as delivering a package to a single location, to more complex operations, like visiting multiple checkpoints along a route to perform inspections, installations, or other services.
Tasks are essential for managing and coordinating field operations, ensuring that employees are clear about their responsibilities, and allowing managers to monitor progress, optimize routes, and ensure that all jobs are completed efficiently. In the field, employees can view their task using the [X-GPS ](/docs/user/guide/x-gps-mobile-apps/x-gps-tracker/task-assignment.md)Tracker app.
Tasks page
## How to create a task
To create a task in Navixy, follow these steps:
{% hint style="info" %}
The only required fields are task name and address.
{% endhint %}
{% stepper %}
{% step %}
#### Go to Tasks
Navigate to the **Tasks** tab in the **Field service** module.
{% endstep %}
{% step %}
#### Start creating a task
Click **+** to open the task creation dialogue.

{% endstep %}
{% step %}
#### Enter task name
Enter a descriptive task name that helps identify the purpose of the task. This could be the name of the customer or a brief description of the task, such as "Install Equipment" or "Inspect Communications."
{% endstep %}
{% step %}
#### Set task address
Manually enter the task address, select a point on the map, or use geographic coordinates. This will define the primary location for a single task or the first checkpoint for a route task.
{% endstep %}
{% step %}
#### Add checkpoints for route tasks
To create a route task (a task that consists of multiple subtasks), click **Add new checkpoint**. Each checkpoint represents an additional stop along the route, and they will be automatically connected in sequence. The employee must complete these checkpoints in the set order.
{% endstep %}
{% step %}
#### Set task date and time
Click **Task date** to open the **Execution period** window and define the date and time range during which the employee should complete the task. You can also configure additional options, such as admissible delay, visit duration, and ignore random visits with a set duration.
{% endstep %}
{% step %}
#### Select the employee responsible for completing the task
Select the driver who performs the task. You can add or configure drivers in **Fleet management → Drivers.**
{% endstep %}
{% step %}
#### Add task information
Provide other task details, including:
* **Task description:** Add any additional details that might be useful to the employee, such as contact information or special instructions.
* **Radius:** Defines the permissible deviation from the specified location. If the employee or vehicle arrives within this radius, their status will be set to **Arrived**, allowing them to complete the task.
* **Form:** Select the form that the employee needs to submit to complete the task. Forms can be filled out directly in the [X-GPS Tracker](/docs/user/guide/x-gps-mobile-apps/x-gps-tracker.md) app.
* **Tags:** Add relevant tags to the task to facilitate easy searching and categorization later.
* **Order ID:** Assign an order ID that the client can use to track the status of the task via the **Courier on the map** feature.
{% endstep %}
{% step %}
#### Finalize task creation
Click **Save** to finish creating the task. The selected employee will receive the task with the attached form in the X-GPS Tracker mobile app, ensuring all necessary documentation is available during task execution.
{% endstep %}
{% endstepper %}
## Single and route tasks
**Single tasks** are straightforward tasks where the employee visits a single location to perform the assigned duties. The task is completed once the employee has arrived at the specified address (status: **Arrived**) and performed the required actions, such as submitting the attached [form](/docs/user/guide/field-service/forms.md).
**Route tasks** involve multiple checkpoints that the employee must visit in a specific order. This type of task is ideal for situations where the employee needs to visit several locations along a planned route, such as deliveries or inspections.
## Optimize route
**Optimize route** is a feature that helps couriers deliver packages efficiently by determining the best sequence for visiting multiple addresses across a city. It considers the location of each address, specific delivery time windows, and the starting point of the task to create the most optimal route. To use it, click **Optimize route** at the bottom of the left panel of a configured route task. You'll be prompted to enter the start address and time.
**Key benefits:**
* **Fuel savings:** Minimizes travel distance, reducing fuel consumption.
* **Faster deliveries:** Optimizes the sequence for quicker task completion.
* **Enhanced productivity:** Automates route planning, allowing couriers to focus on deliveries.
The platform can optimize up to 25 points in a single route task, ensuring all deliveries are made on time and in the most efficient order.
## How to import tasks
When managing a large workforce or numerous tasks, importing tasks from an Excel file is more efficient than manually creating and assigning them one by one. This is particularly useful when tasks are generated by external systems such as CRMs.

## How to import tasks from an Excel file
While developers can import tasks using [Navixy API](https://navixy.com/docs/navixy-api/), there’s a simpler method: importing tasks from an Excel file. Follow these steps to import your tasks to the Navixy platform:
{% stepper %}
{% step %}
#### Start the import process
Hover your mouse over the **+** button in the tasks section and click **XLS**.
{% endstep %}
{% step %}
#### Prepare the file
In the **Tasks import** window, click **File example** template to download a template. Adjust your files to match it.
{% endstep %}
{% step %}
#### Upload the file
The only required field is the file itself. Max size is 10 Mb. Allowed formats are XLS, XLSX, and CSV.
{% endstep %}
{% step %}
#### Configure import settings
You can configure the following settings for uploaded tasks:
* **Default radius:** Defines the permissible deviation from the specified location. If the employee or vehicle arrives within this radius, the task will be considered completed even if they don’t reach the exact location.
* **Auto-assign tasks:**
* **Do not assign:** Tasks are assigned to all employees.
* **To employees:** Check the employees you want to be assigned the task or tasks.
* **Ignore address:** Tasks are assigned without regard for the employee's address.
* **Use employee address**: Tasks are assigned based on proximity to the employee's home address.
* **Use department address:** Tasks are assigned according to the distance from the employee's department.
* **To vehicles:**
* **Ignore address:** Tasks are assigned without regard for the vehicle's address.
* **Use garage address:** Tasks are assigned based on proximity to the garage.
{% hint style="info" %}
The addresses of departments and employees should be specified on their respective profile cards.
{% endhint %}
{% endstep %}
{% step %}
#### Finalize import
Click **Next** to finish importing the task or tasks.
{% endstep %}
{% endstepper %}
## How to import tasks from a TXT file
{% stepper %}
{% step %}
#### Start the import process
Hover your mouse over the **+** button in the tasks section and click **TXT.**
{% endstep %}
{% step %}
#### Enter your tasks
Paste your tasks directly from the spreadsheet into the large field on the left of the **Tasks import** window (the only required field). Pay attention to the column headers.
{% endstep %}
{% step %}
#### Configure import settings
Just like with importing from an Excel file, you can set the following options:
* **Default radius:** Defines the permissible deviation from the specified location. If the employee or vehicle arrives within this radius, the task will be considered completed even if they don’t reach the exact location.
* **Auto-assign tasks:**
* **Do not assign:** Tasks are assigned to all employees.
* **To employees:** Check the employees you want to be assigned the task or tasks.
* **Ignore address:** Tasks are assigned without regard for the employee's address.
* **Use employee address**: Tasks are assigned based on proximity to the employee's home address.
* **Use department address:** Tasks are assigned according to the distance from the employee's department.
* **To vehicles:**
* **Ignore address:** Tasks are assigned without regard for the vehicle's address.
* **Use garage address:** Tasks are assigned based on proximity to the garage.
{% hint style="info" %}
The addresses of departments and employees should be specified on their respective profile cards.
{% endhint %}
{% endstep %}
{% step %}
#### Finalize import
Click **Next** to finish importing the task or tasks.
{% endstep %}
{% endstepper %}
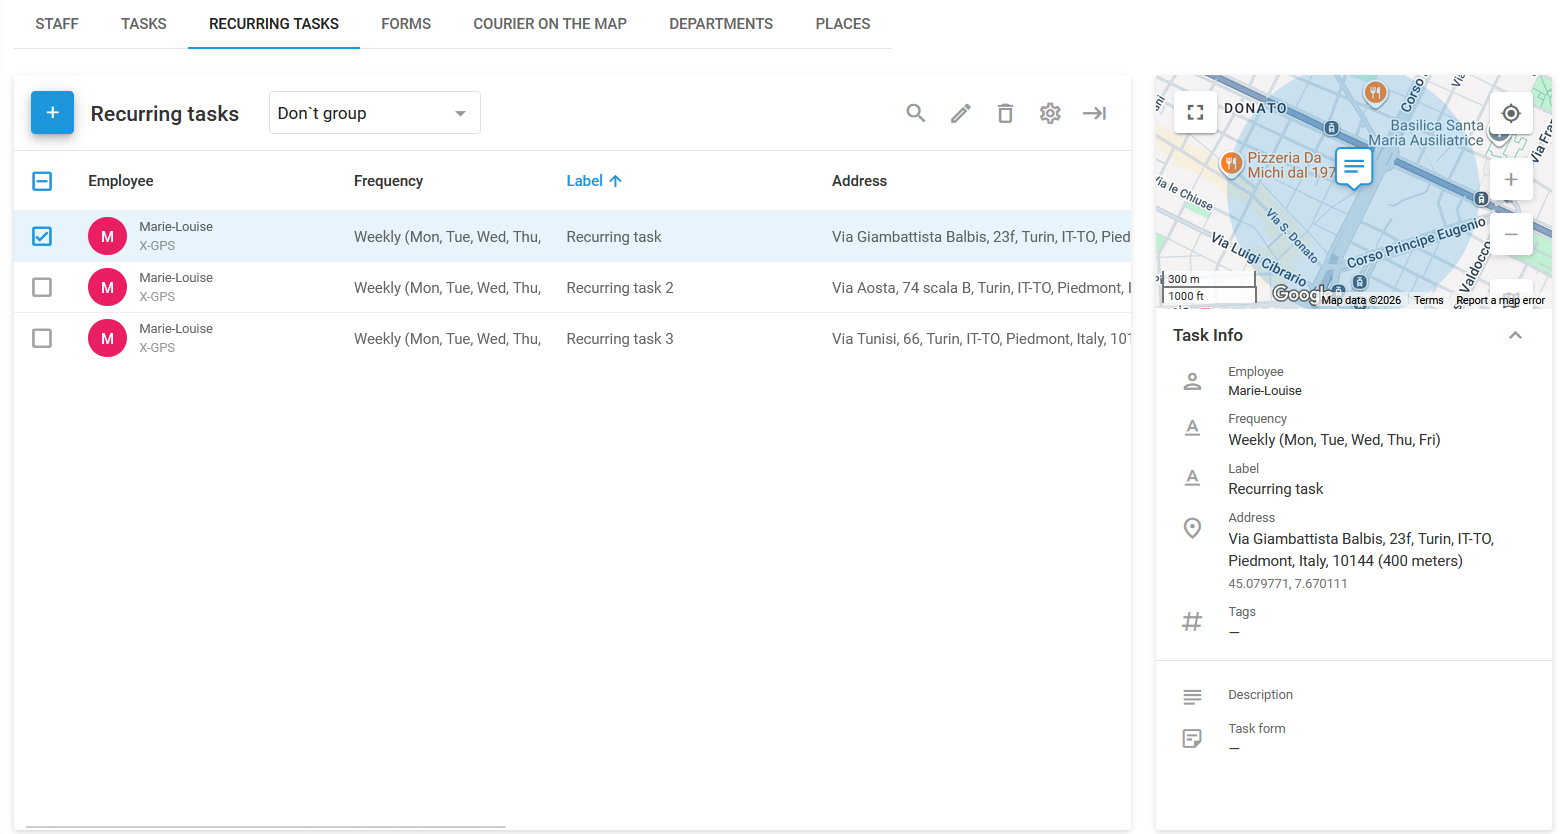
## Recurring tasks
Recurring tasks are tasks that are automatically repeated in set intervals. They are displayed on the **Recurring tasks** page of the **Field service** module.
## How to create a recurring task
To create a recurring task, follow these steps:
{% hint style="danger" %}
At the moment, recurring tasks aren't supported by [X-GPS Tracker](/docs/user/guide/x-gps-mobile-apps/x-gps-tracker.md).
{% endhint %}
{% stepper %}
{% step %}
#### Go to Recurring tasks
Navigate to the **Recurring tasks** tab in the **Field service** module.
{% endstep %}
{% step %}
#### Start creating a recurring task
Click **+** to open the task creation dialogue.
{% endstep %}
{% step %}
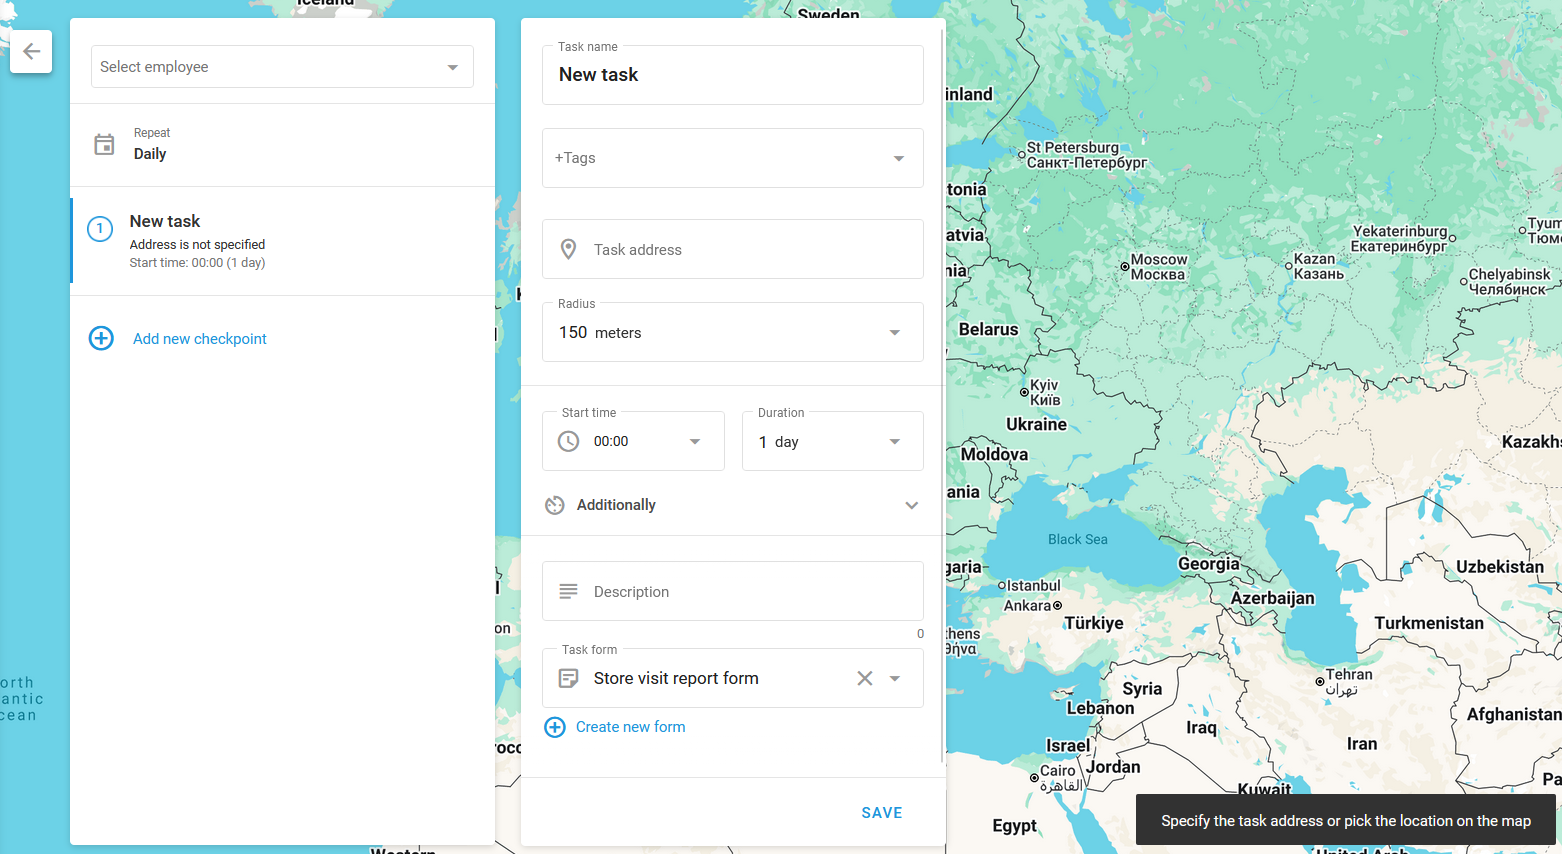
#### Enter task name
Enter a descriptive task name that helps identify the purpose of the task. This could be the name of the customer or a brief description of the task, such as "Install Equipment" or "Inspect Communications."
{% endstep %}
{% step %}
#### Set task address
Manually enter the task address, select a point on the map, or use geographic coordinates. This will define the primary location for a single task or the first checkpoint for a route task.
{% endstep %}
{% step %}
#### Configure repeat frequency
Click the **Repeat** block to open the recurrence settings and choose a preset or manually configure the dates when the task will be performed.
{% endstep %}
{% step %}
#### Add checkpoints for route tasks
To create a route task (a task that consists of multiple subtasks), click **Add new checkpoint**. Each checkpoint represents an additional stop along the route, and they will be automatically connected in sequence. The employee must complete these checkpoints in the set order.
{% endstep %}
{% step %}
#### Set task time and duration
Define the date and time range during which the employee should complete the task. This ensures that the task is completed within the designated timeframe.
Click **Additionally** to display additional options, such as admissible delay, visit duration, and ignore random visits with a set duration.
{% endstep %}
{% step %}
#### Select the employee responsible for completing the task
Select the driver who performs the task. You can add or configure drivers in **Fleet management → Drivers.**
{% endstep %}
{% step %}
#### Add task information
Provide other task details, including:
* **Description:** Add any additional details that might be useful to the employee, such as contact information or special instructions.
* **Radius:** Defines the permissible deviation from the specified location. If the employee or vehicle arrives within this radius, their status will be set to **Arrived**, allowing them to complete the task.
* **Form:** Select the form that the employee needs to submit to complete the task.
* **Tags:** Add relevant tags to the task to facilitate easy searching and categorization later.
* **Order ID:** Assign an order ID that the client can use to track the status of the task via the **Courier on the map** feature.
{% endstep %}
{% step %}
#### Finalize task creation
Click **Save** to finish creating the task.
{% endstep %}
{% endstepper %}
---
# Agent Instructions
This documentation is published with GitBook. GitBook is the documentation platform designed so that both humans and AI agents can read, navigate, and reason over technical content effectively. Learn more at gitbook.com.
## Querying This Documentation
If you need additional information that is not directly available in this page, you can query the documentation by asking a question.
Perform an HTTP GET request on the following URL with the `ask` and `goal` query parameters:
```
GET https://navixy.com/docs/user/guide/field-service/tasks.md?ask=&goal=
```
`ask` is the immediate question: it should be specific, self-contained, and written in natural language.
`goal` is what the user is ultimately trying to achieve, the reason they need the answer. Sharing it helps GitBook give you a better, more relevant answer. A goal is most helpful when it describes the outcome the user wants rather than restating the question. For example, with `ask=how do I create an API token`, a goal like `automate deployments from our CI pipeline` lets GitBook tailor the answer to that use case.
The response will contain a direct answer to the question and relevant excerpts and sources from the documentation.
Use this mechanism when the answer is not explicitly present in the current page, you need clarification or additional context, or you want to retrieve related documentation sections.