> For the complete documentation index, see [llms.txt](https://navixy.com/docs/llms.txt). Markdown versions of documentation pages are available by appending `.md` to page URLs; this page is available as [Markdown](https://navixy.com/docs/user/guide/field-service/forms.md).
# Forms
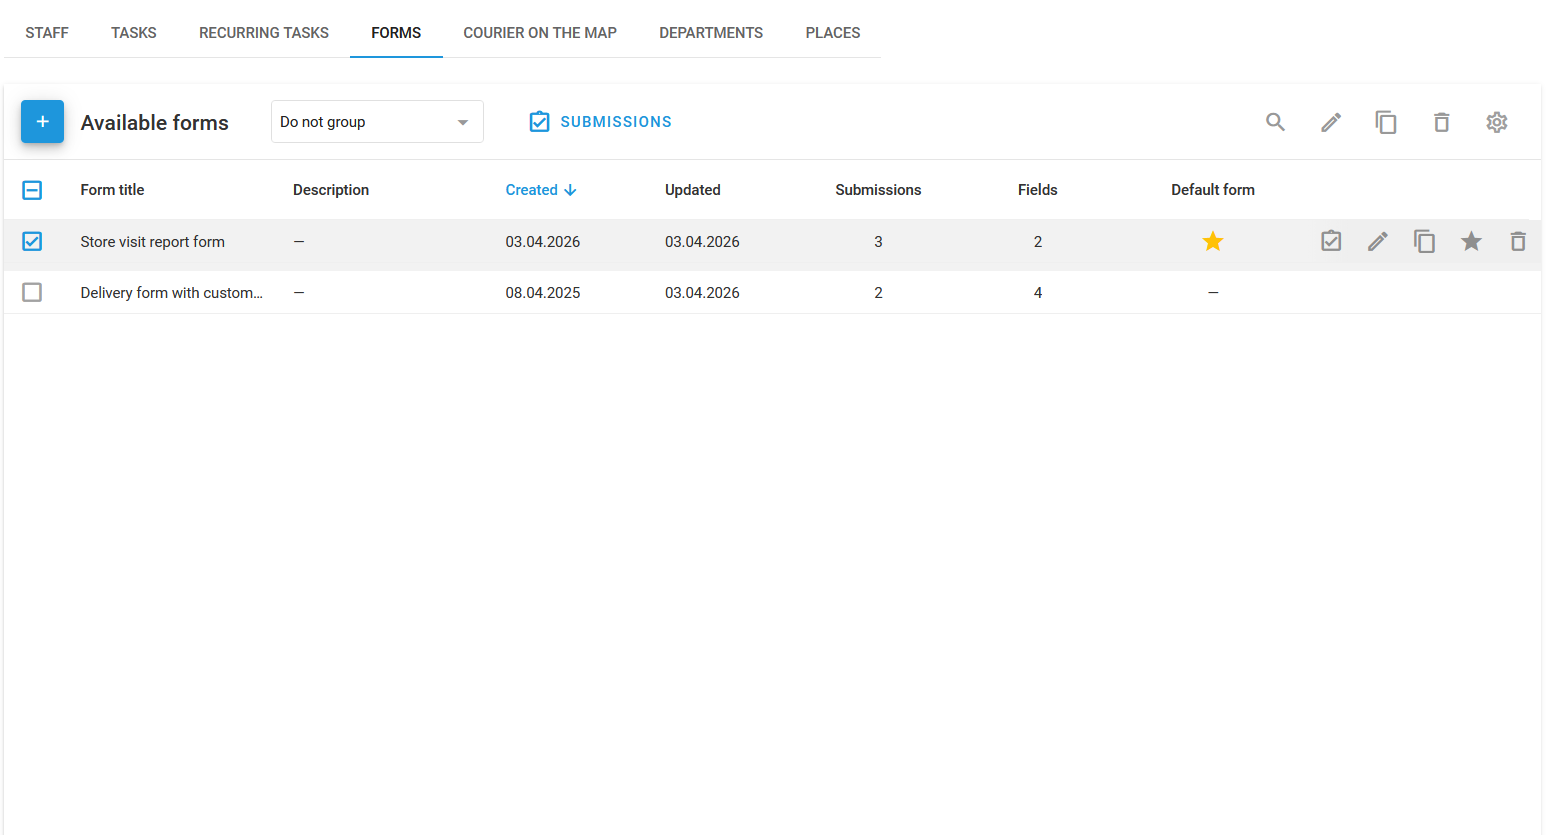
Design electronic forms for field tasks and let employees submit text, signatures, and photos via the X-GPS Tracker app when completing assignments.
**Forms** are electronic documents that can be attached to tasks, allowing employees to submit task results directly through the [X-GPS Tracker](/docs/user/guide/x-gps-mobile-apps/x-gps-tracker.md) mobile app. These forms can include various types of fields such as text fields for client orders, inspection reports, and media sections for uploading photos and videos.
Forms page
{% embed url="" %}
## How to create a form
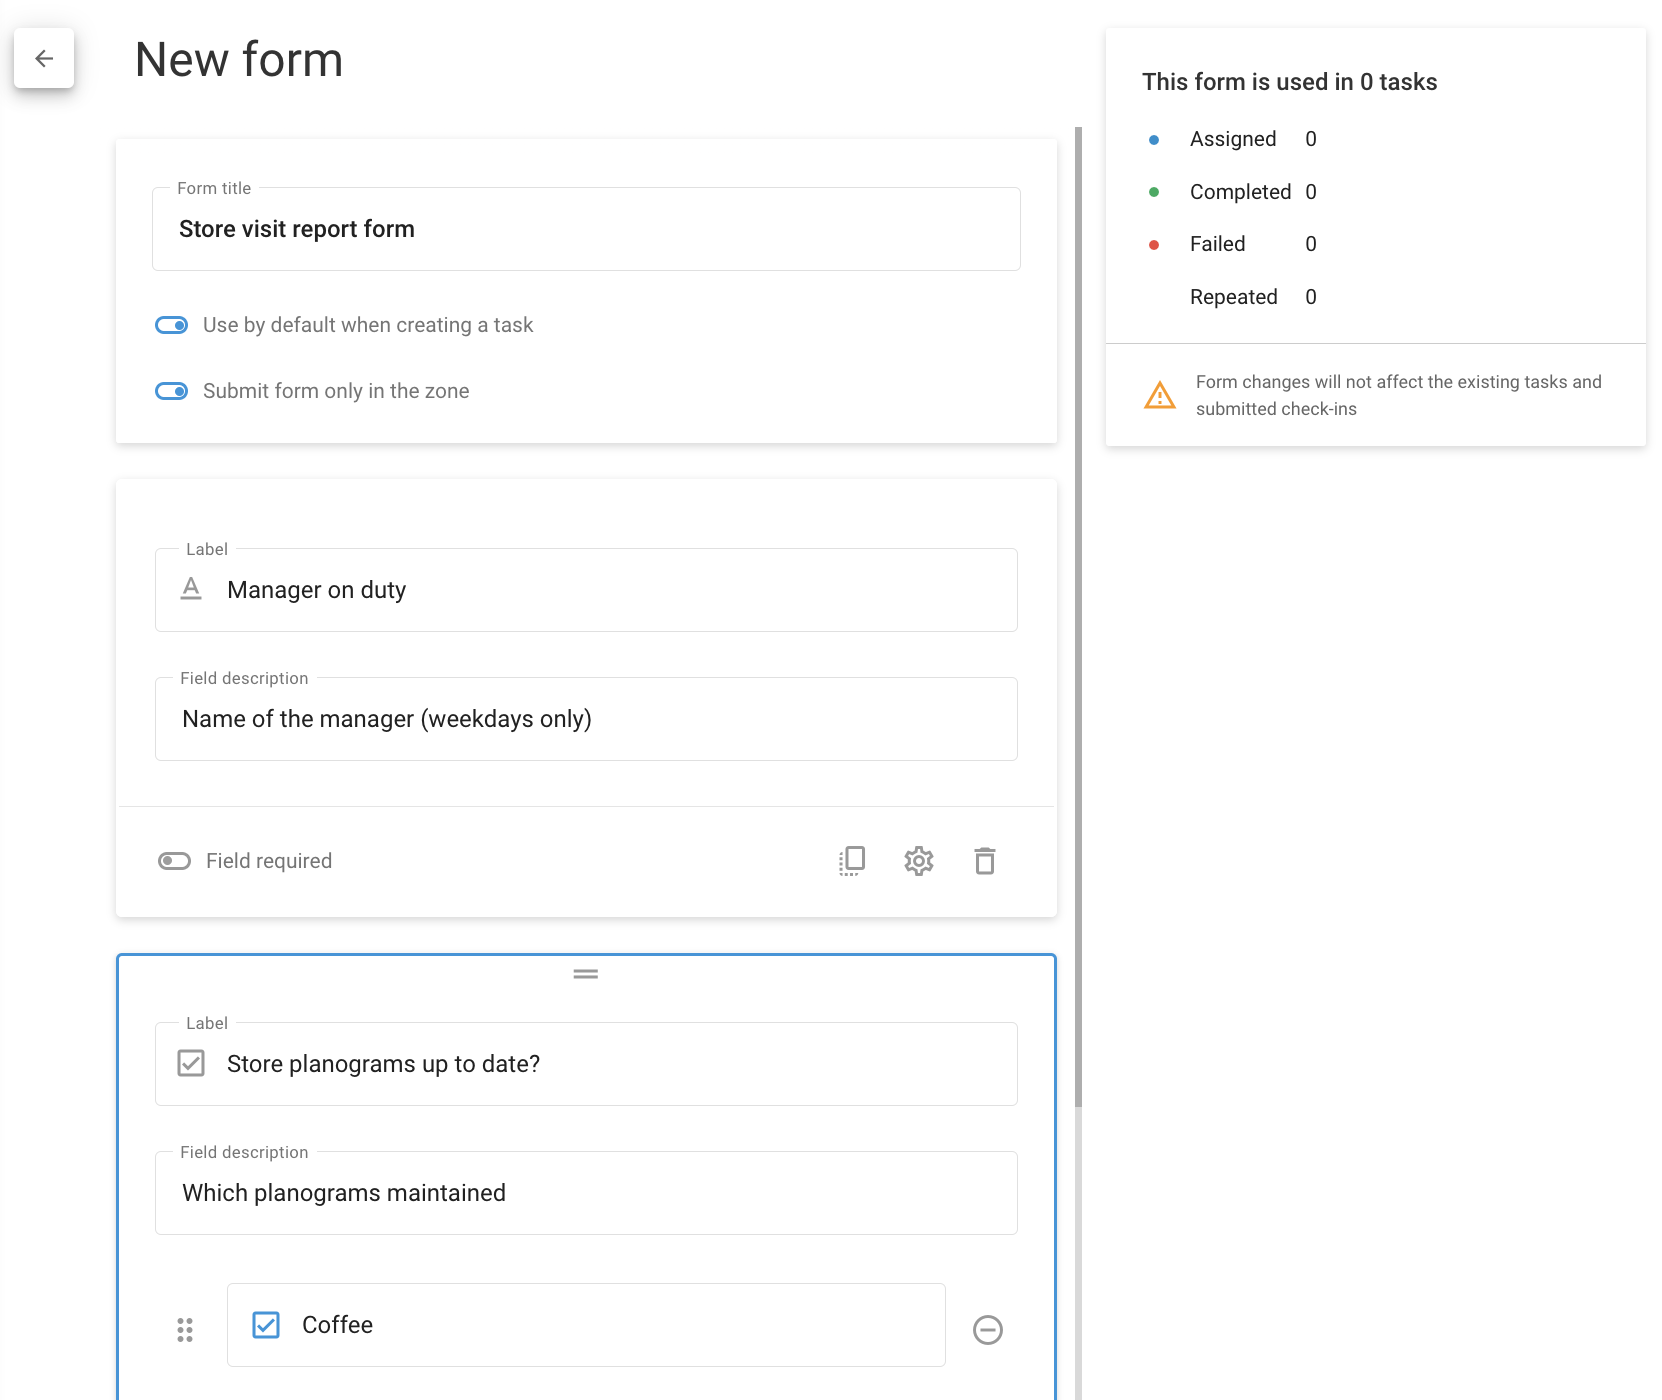
Creating a new form
To create a form in Navixy, follow the steps below. This process allows you to create as many forms as needed, ensuring they are tailored to the tasks your employees perform.
{% stepper %}
{% step %}
#### Go to Forms
Open the **Field service** module from the main menu and select the **Forms** tab.
{% endstep %}
{% step %}
#### Start creating a form
Click **+** to open the form creation dialogue.
{% endstep %}
{% step %}
#### Configure a form
Choose the necessary components (e.g., text fields, checkboxes, dropdowns, date, rating, image, file attachment, signature, and section separators) from the left side of the screen. Customize the form to suit your company's specific workflow and tasks.
{% endstep %}
{% step %}
#### Save the form
{% endstep %}
{% endstepper %}
Two toggles are available when creating a form:
* **Use by default when creating a task**: If enabled, this form will be attached to new tasks by default unless another form is selected. In the form list, this form will be marked with a star.
* **Submit form only in the zone**: If enabled, the form can only be submitted when the employee is within a predefined geographic zone, ensuring that task reporting occurs at the correct location.
After saving, the created forms can be accessed through the form list.

## How to attach a form to a task
To attach a form to a task, follow these steps:
{% hint style="info" %}
For detailed information about creating a task, see [How to create a task](/docs/user/guide/field-service/tasks.md#how-to-create-a-task).
{% endhint %}
{% stepper %}
{% step %}
#### Open the Task creation window
Navigate to **Tasks** tab and click **+** to open the task creation dialogue.
{% endstep %}
{% step %}
#### Select the employee responsible for completing the task
Select the driver who performs the task. You can add or configure drivers in **Fleet management → Drivers.**
{% endstep %}
{% step %}
#### Select the task form
Choose the form you created earlier from the dropdown list at the bottom of the window.
{% endstep %}
{% step %}
#### Add task information
Provide other task details.
{% endstep %}
{% step %}
#### Finalize task creation
Click **Save** to finish creating the task. The selected employee will receive the task with the attached form in the X-GPS Tracker mobile app, ensuring all necessary documentation is available during task execution.
{% endstep %}
{% endstepper %}
## How to submit a form in X-GPS Tracker
Employees are required to fill out forms during or after completing a task. Follow these steps to complete and submit a form:
{% stepper %}
{% step %}
#### Open X-GPS Tracker
Open the X-GPS Tracker app on your mobile device. If you don't have it set up, see [Invitation to X-GPS Tracker](/docs/user/guide/x-gps-mobile-apps/x-gps-tracker/invitation-to-x-gps-tracker.md) to learn how to receive access.
{% endstep %}
{% step %}
#### Switch to Tasks
Switch to the **Tasks** screen to view the list of assigned tasks:\

{% endstep %}
{% step %}
#### Select the task to open it
Tap the task to open its details:\

{% endstep %}
{% step %}
#### Open the form
Tap the form attached to the task and fill in all mandatory fields:\

{% endstep %}
{% step %}
#### Submit the form
Once all fields are filled, click **Submit** to send the form to the monitoring service. If your status is **Arrived**, the task status will automatically change to **Complete**.
{% endstep %}
{% endstepper %}
## How to set up notifications for form submission
To ensure timely notifications when a form is submitted, configure alerts by following these steps:
{% stepper %}
{% step %}
#### Go to Rules and alerts
Navigate to the [Rules and alerts](/docs/user/guide/events-and-notifications.md) module.
{% endstep %}
{% step %}
#### Go to **Alert rules**
Click **Set rules** to open the **Alert rules** section.
{% endstep %}
{% step %}
#### Add a new rule
Start creating a new notification rule by clicking **+**.
{% endstep %}
{% step %}
#### Select the objects
Select the objects to which the rule will apply.
{% endstep %}
{% step %}
#### Select the rule type
Choose [Task performance](/docs/user/guide/events-and-notifications/scheduling-and-dispatching/task-performance.md) in the **Type** drop-down menu. You can also give the rule a name.
{% endstep %}
{% step %}
#### Configure the rule
Check the **Form submitted** checkbox in the second alert group. You can also enable the **Form resubmitted** option that appears if **Form submitted** is checked.
{% endstep %}
{% step %}
#### Configure notifications
Enter notification text, notification type (emergency or push), and notification recipients by SMS or email.
{% endstep %}
{% endstepper %}
These settings ensure you stay informed about task progress and form submissions in real time.
## How to view completed forms
You can review and compare completed forms to assess employee performance and task outcomes by following these steps:
{% stepper %}
{% step %}
#### Go to Forms
Open the **Field service** module from the main menu and select the **Forms** tab.
{% endstep %}
{% step %}
#### Select the form
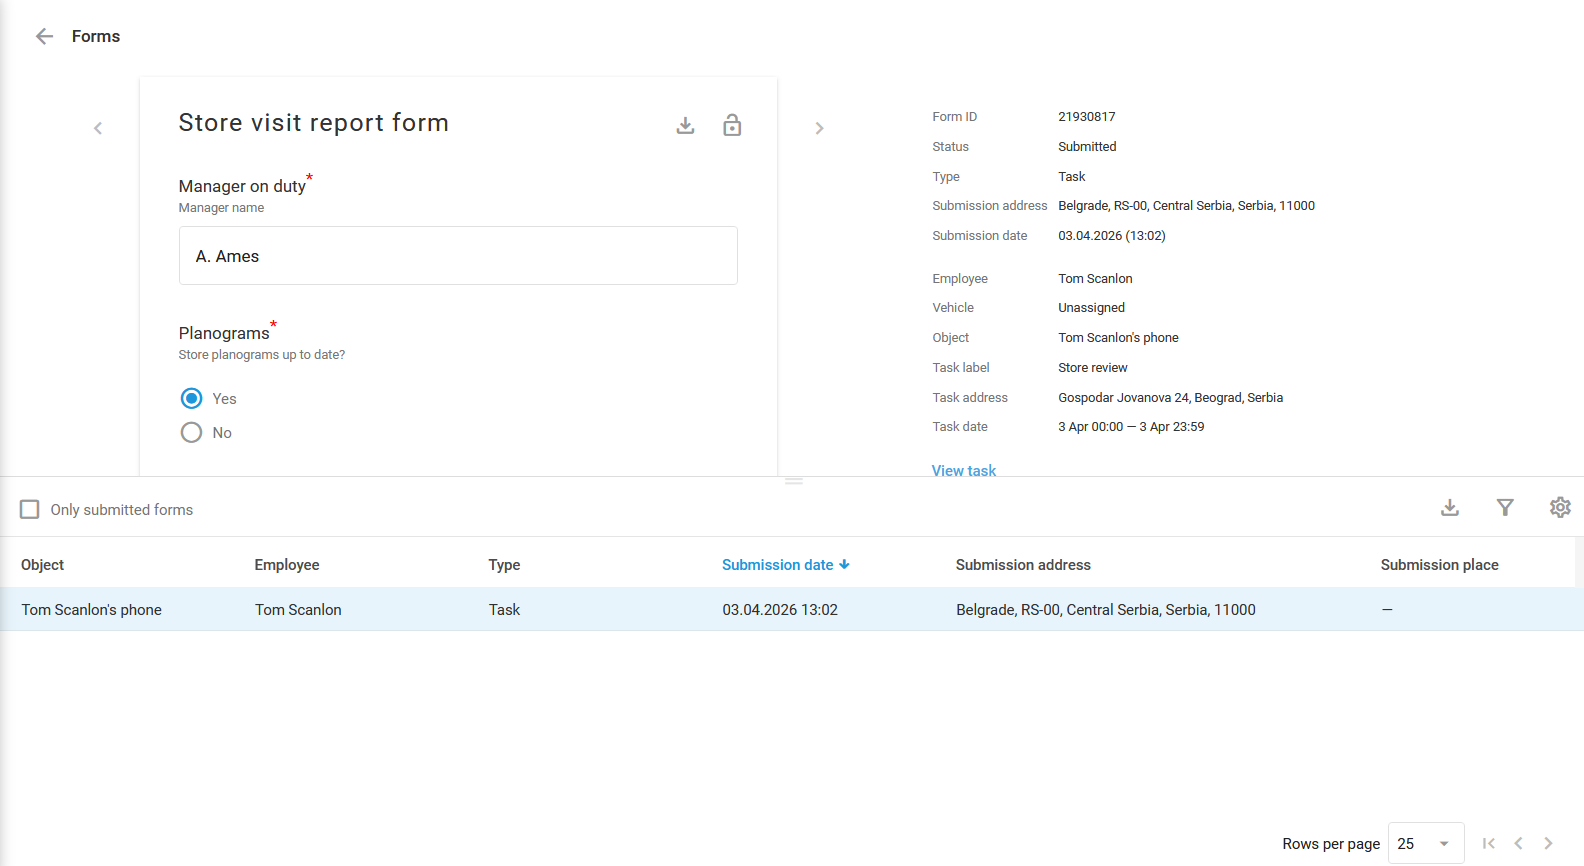
Select the form you wish to review and click **Submissions** on the right side or the **Submissions** button on the toolbar.
{% endstep %}
{% step %}
#### View the submission page
The submission page allows you to review and download the submitted form or forms.
To download the selected form in XLSX or PDF, click next to the form name. locks and unlocks form editing.
If multiple forms have been submitted, you can download the form list in XLSX, CSV, or PDF format. The forms table supports filtering submissions based on parameters like task creation date or employee name and customization by adding or hiding columns and form fields to focus on the most relevant data.
{% endstep %}
{% endstepper %}
## How to create task form values report
The task form values report provides insights into employee performance based on completed forms. It shows form statistics, including the frequency and types of components selected. This data helps you evaluate employee performance and task outcomes more effectively.
To generate this report, follow these steps:
{% stepper %}
{% step %}
#### Go to Reports
Navigate to the [Reports](/docs/user/guide/reports.md) module.
{% endstep %}
{% step %}
#### Start creating the report
Click **Create report** to open the report generation dialogue.
{% endstep %}
{% step %}
#### Choose the report type
Select **Task form values**.
{% endstep %}
{% step %}
#### Configure the report
Check the objects for which you need the report and select the timeframe. You can also choose to hide empty tabs and show unselected options.
{% endstep %}
{% step %}
#### Finish creating the report
Click **Build report** to generate the report. After it's ready, it will appear on the reports list.
{% endstep %}
{% endstepper %}
---
# Agent Instructions
This documentation is published with GitBook. GitBook is the documentation platform designed so that both humans and AI agents can read, navigate, and reason over technical content effectively. Learn more at gitbook.com.
## Querying This Documentation
If you need additional information that is not directly available in this page, you can query the documentation by asking a question.
Perform an HTTP GET request on the following URL with the `ask` and `goal` query parameters:
```
GET https://navixy.com/docs/user/guide/field-service/forms.md?ask=&goal=
```
`ask` is the immediate question: it should be specific, self-contained, and written in natural language.
`goal` is what the user is ultimately trying to achieve, the reason they need the answer. Sharing it helps GitBook give you a better, more relevant answer. A goal is most helpful when it describes the outcome the user wants rather than restating the question. For example, with `ask=how do I create an API token`, a goal like `automate deployments from our CI pipeline` lets GitBook tailor the answer to that use case.
The response will contain a direct answer to the question and relevant excerpts and sources from the documentation.
Use this mechanism when the answer is not explicitly present in the current page, you need clarification or additional context, or you want to retrieve related documentation sections.

 next to the form name.
  locks and unlocks form editing.
If multiple forms have been submitted, you can download the form list in XLSX, CSV, or PDF format. The forms table supports filtering submissions based on parameters like task creation date or employee name and customization by adding or hiding columns and form fields to focus on the most relevant data.
{% endstep %}
{% endstepper %}
## How to create task form values report
The task form values report provides insights into employee performance based on completed forms. It shows form statistics, including the frequency and types of components selected. This data helps you evaluate employee performance and task outcomes more effectively.
To generate this report, follow these steps:
{% stepper %}
{% step %}
#### Go to Reports
Navigate to the [Reports](/docs/user/guide/reports.md) module.
{% endstep %}
{% step %}
#### Start creating the report
Click **Create report** to open the report generation dialogue.
{% endstep %}
{% step %}
#### Choose the report type
Select **Task form values**.
{% endstep %}
{% step %}
#### Configure the report
Check the objects for which you need the report and select the timeframe. You can also choose to hide empty tabs and show unselected options.
{% endstep %}
{% step %}
#### Finish creating the report
Click **Build report** to generate the report. After it's ready, it will appear on the reports list.
locks and unlocks form editing.
If multiple forms have been submitted, you can download the form list in XLSX, CSV, or PDF format. The forms table supports filtering submissions based on parameters like task creation date or employee name and customization by adding or hiding columns and form fields to focus on the most relevant data.
{% endstep %}
{% endstepper %}
## How to create task form values report
The task form values report provides insights into employee performance based on completed forms. It shows form statistics, including the frequency and types of components selected. This data helps you evaluate employee performance and task outcomes more effectively.
To generate this report, follow these steps:
{% stepper %}
{% step %}
#### Go to Reports
Navigate to the [Reports](/docs/user/guide/reports.md) module.
{% endstep %}
{% step %}
#### Start creating the report
Click **Create report** to open the report generation dialogue.
{% endstep %}
{% step %}
#### Choose the report type
Select **Task form values**.
{% endstep %}
{% step %}
#### Configure the report
Check the objects for which you need the report and select the timeframe. You can also choose to hide empty tabs and show unselected options.
{% endstep %}
{% step %}
#### Finish creating the report
Click **Build report** to generate the report. After it's ready, it will appear on the reports list.