> For the complete documentation index, see [llms.txt](https://navixy.com/docs/llms.txt). Markdown versions of documentation pages are available by appending `.md` to page URLs; this page is available as [Markdown](https://navixy.com/docs/user/guide/devices-and-settings/vehicle-sensors/specialized-sensors-by-manufacturer/teltonika-sensors/ble-fuel-level-sensors-teltonika.md).
# BLE fuel level sensors (Teltonika)
Many [Teltonika GPS devices](https://www.navixy.com/devices/teltonika/) support wireless Fuel sensors that connect via Bluetooth. The advantages of using these Bluetooth fuel sensors are significant:
* **No wires**: The sensor and GPS device do not need a physical connection, simplifying installation.
* **Independence from external power sources**: These sensors come with a built-in battery that can last for several years without the need for recharging.
* **Additional data**: In addition to fuel levels, the sensor also transmits data on temperature, humidity, and the battery charge level.
## GPS device preparation
To prepare your Teltonika GPS device for Bluetooth fuel sensor integration, follow these steps.
1. **Download the Teltonika configurator**: Obtain the app from the official Teltonika website.
2. **Update the firmware**: Ensure that your device is running the latest firmware version.
3. **Run the configurator**:
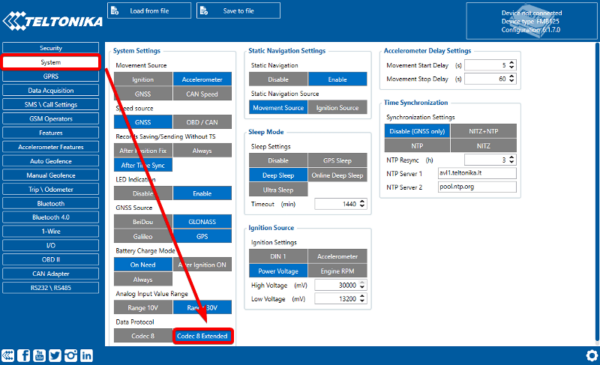
* Go to the **System** tab.
* Change the data transfer protocol to **Codec 8 Extended** (see the note below for why this is required).
4. **Connect the fuel sensor**:
* Navigate to the **Bluetooth** tab in the configurator.
* Connect the fuel sensor to the GPS device.
5. **Enable the necessary parameters**:
* Go to the **I/O** tab.
* Ensure that the parameter corresponding to the fuel sensor is enabled.
{% hint style="warning" %}
**Codec 8 Extended** is Teltonika’s proprietary communication protocol that supports up to 65,535 data parameters (AVL IDs), allowing for more detailed data transmission compared to the standard Codec 8, which supports only 255.
{% endhint %}
## Sensor setup in Navixy
Once the GPS device is connected and transmitting fuel data, follow these steps to set up the corresponding sensors on the Navixy platform.
{% stepper %}
{% step %}
### Create a new measurement sensor
1. Navigate to Devices and settings → Sensors and buttons.
2. Click Create a new [measurement sensor](/docs/user/guide/devices-and-settings/vehicle-sensors/measurement-sensors.md).
{% endstep %}
{% step %}
### Configure the sensor
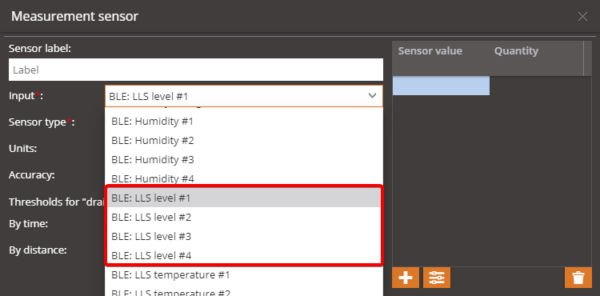
1. Select the input labeled "BLE: LLS level".
2. Set the sensor type and units. If necessary, fill in the calibration table and adjust other settings.
{% endstep %}
{% step %}
### Repeat for additional sensors
If you have multiple fuel sensors, repeat the setup process for each sensor, selecting the appropriate input for each.
{% endstep %}
{% step %}
### Monitor and report
Once configured, you can monitor the fuel level in the designated widget on the platform. You can also generate detailed reports on fuel consumption.
{% endstep %}
{% endstepper %}
---
# Agent Instructions
This documentation is published with GitBook. GitBook is the documentation platform designed so that both humans and AI agents can read, navigate, and reason over technical content effectively. Learn more at gitbook.com.
## Querying This Documentation
If you need additional information that is not directly available in this page, you can query the documentation dynamically by asking a question.
Perform an HTTP GET request on the current page URL with the `ask` query parameter, and the optional `goal` query parameter:
```
GET https://navixy.com/docs/user/guide/devices-and-settings/vehicle-sensors/specialized-sensors-by-manufacturer/teltonika-sensors/ble-fuel-level-sensors-teltonika.md?ask=&goal=
```
`ask` is the immediate question: it should be specific, self-contained, and written in natural language.
`goal` is optional and describes the broader end goal you are ultimately trying to accomplish on behalf of the user. GitBook uses it to tailor the answer towards what is most useful for that goal.
The response will contain a direct answer to the question and relevant excerpts and sources from the documentation.
Use this mechanism when the answer is not explicitly present in the current page, you need clarification or additional context, or you want to retrieve related documentation sections.